Half-healthy, half-sick––taking a proper turf disease sample…
Contact
Wendell Hutchens
Assistant Professor - Horticulture
Email: whutchens@uada.edu
University of Arkansas System Division of Agriculture
Cooperative Extension Service
2301 S. University Ave.
Little Rock, AR 72204
Half-healthy, half-sick––taking a proper turf disease sample…
Wendell Hutchens
Turf pathologists and disease diagnosticians frequently inspect sick turf samples under a microscope to determine if potential pathogens are causing turf health to decline. These samples are commonly sent into diagnostic clinics from turf professionals, extension agents, and homeowners. You must remember, diagnosticians have only the information you provide them with, and many pathogens are frequently present in any given sample that arrives in the diagnostic clinic even though they may not always be the cause of the symptoms you are seeing. The best example of this is the winterkill issues (Figure 1).

Naturally, the tendency is to think death and destruction is caused by a disease, especially since plant pathogens are often found in dead and decaying turf samples. The presence of pathogens in a sample, however, does not mean the pathogen caused the devastation. The turf symptoms must match up with the pathogen(s) present. If you submit an improper turf sample, no supporting pictures, and no supporting spray records to the diagnostic lab, correct disease identification is extremely difficult.
Question…when you feel sick or in pain, do your expect your the doctor to figure out what is wrong with you without any communication whatsoever? No, you usually tell the doctor how you are feeling or where it hurts or when you started feeling bad or what medicines you have taken, etc.
The same principle applies with turf grass samples. The more information you can provide, the more accurate — and most expedited — the diagnosis will be. Three things need to happen to get a quick and accurate diagnosis:
- Collect a sample properly
- Ship the sample overnight to keep it viable
- Provide supporting pictures and any spray records
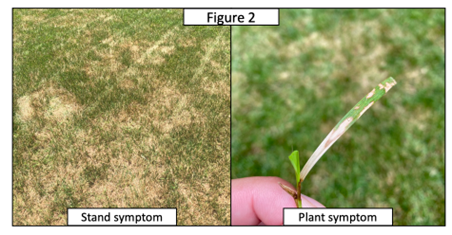
1) Collecting a proper turf sample takes just a few simple steps. First, identify an area that looks abnormal. Look for declining turf, patches, spots, leaf lesions, etc. (Figure 2) before taking a sample.
Use a cup-cutter or hand shovel to remove a plug from the edge of the sick area. This sample needs to have half of the plug in the healthy area and half of the plug in the sick area (Figures 3 & 4).
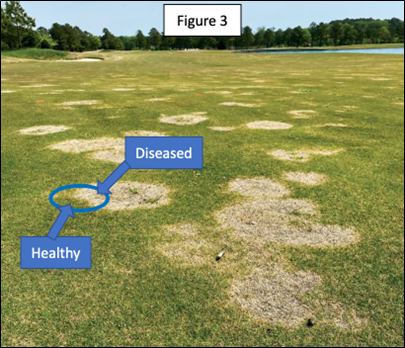

This interface between sick and healthy turf is where the pathogen (if there is one) is most active and helps the diagnostician finding and identify the pathogen under a microscope. For example, brown patch on tall fescue is easily identified microscopically as the pathogen R. solani produces right-angled hyphae (Figure 5).

Another ABSOLUTELY CRITICAL thing to remember is to take the sample BEFORE spraying a fungicide. It is okay to spray a fungicide for a disease (that is what fungicides are for), but, if you want the disease identified, you must take a sample first because as soon as the fungicide is applied, there is a high likelihood that the fungicide will suppress the pathogen tremendously. This makes finding the pathogen in a sample nearly impossible.
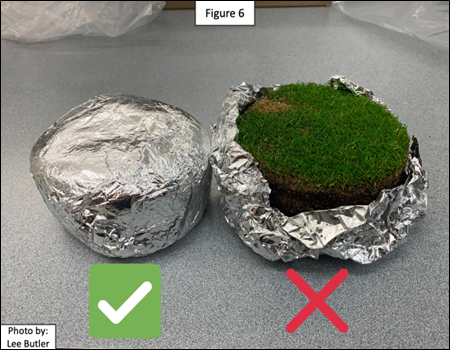
2) Overnight shipping the sick turf sample will help with a rapid and accurate diagnosis. If turf samples are not kept in a cool and appropriate environment, they can die or other saprophytic, non-pathogenic fungi can proliferate and overshadow the actual pathogen. After a sample is taken, wrap the plug in aluminum foil, place securely in a box, and overnight ship it to the diagnostic clinic (Figure 6).
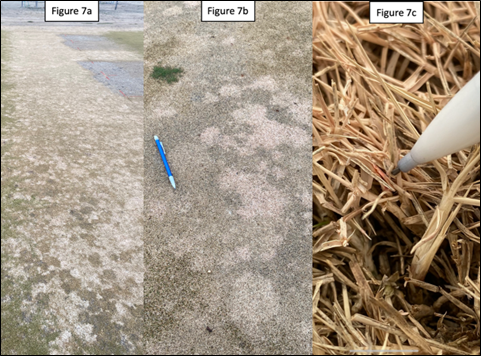
3) Providing supporting pictures and spray records along with the turf sample can make or break a proper diagnosis. The ideal way to photograph of a diseased area is to take a picture starting with the area as a whole, then take a close-up picture of the diseased area, then take a picture of individual plants expressing symptoms (Figure 7a,b,c).
By doing this, you can capture the disease in the context of the surrounding area, get a closer image of the diseased area itself, and an even closer image of individual diseased plants. This helps the diagnostician gain a better understanding of what the damaged area looks like and also allows them to see what the stand and plant symptoms look like. Also, taking photos that include a reference (e.g., a ruler, pocketknife, car keys, pencil, etc.) is important for the diagnostician to gauge the size of the area. Moreover, taking photos of the disease in proper lighting and when symptoms are clearly showing well helps the diagnostician make an accurate diagnosis. Lastly, if you have any recent spray and fertilizer records, including those along with the sample will help the diagnostician piece together what the problem is.
If you follow the above guidelines for taking a proper turf disease sample, you will get a quicker and more accurate diagnosis.